


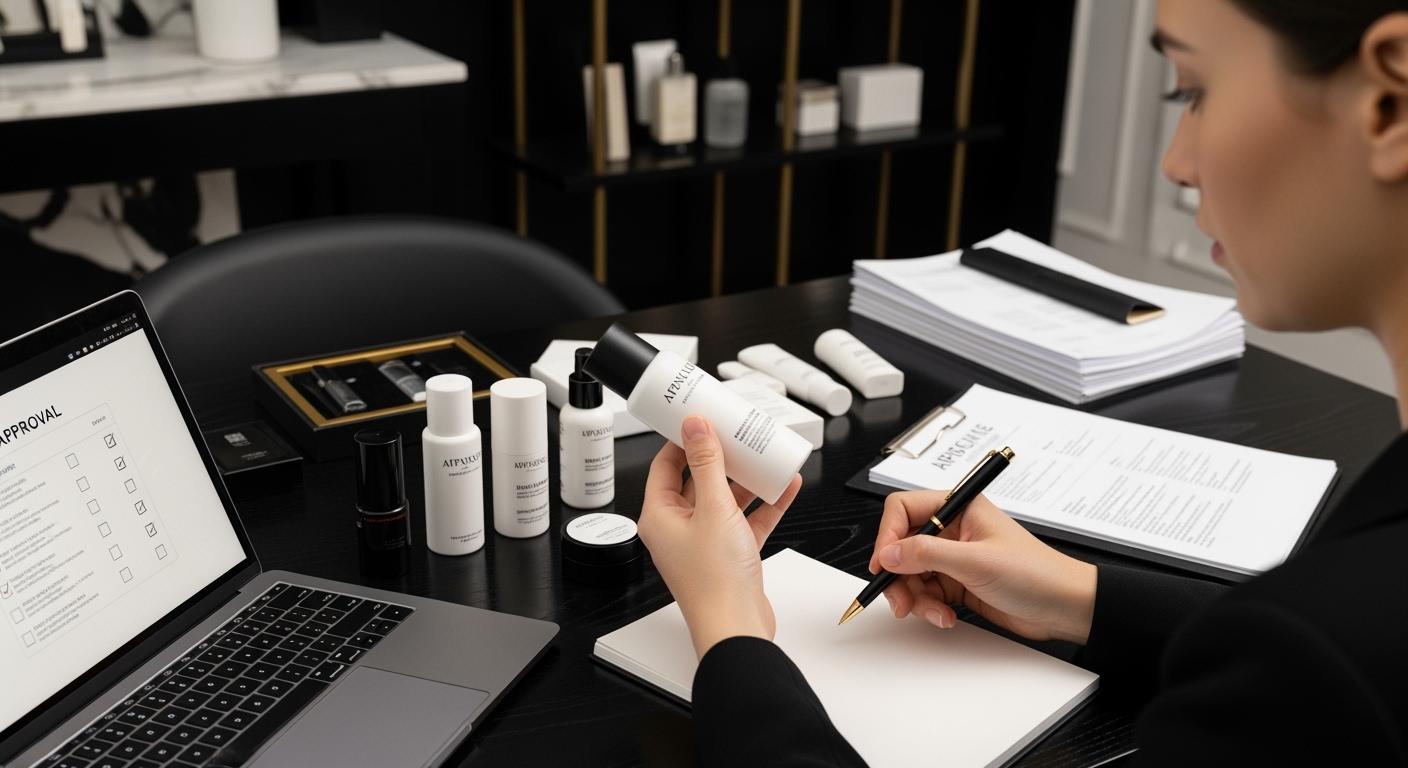
You play a critical role in ensuring every bottle meets your brand’s standards before mass production. Skipping the cosmetic packaging sample approval process exposes you to serious risks. For example, certain active serums may degrade bottle components, and hidden seal integrity issues can lead to leaks during shipping. The table below outlines some of the most common risks brands face when they overlook thorough packaging sample checks:
Risk Type | Description |
|---|---|
Compatibility with formulations | Certain active serums may compromise sealing gaskets, and acidic formulations may degrade components. |
Seal Integrity | Issues may remain hidden until bottles are filled and subjected to shipping stresses. |
Performance in real-world conditions | Simple tests like inversion and static sealing can identify potential risks before mass production. |
By understanding these risks, you can protect your brand’s reputation and ensure reliable packaging for every bottle you produce.
Key Takeaways
Thoroughly inspect cosmetic packaging samples to avoid risks like leaks and product degradation.
Check visual elements such as logo placement and color accuracy to maintain brand integrity.
Conduct functional tests to ensure durability and seal integrity before mass production.
Verify material compatibility with formulations to prevent adverse reactions and ensure product safety.
Maintain clear communication with suppliers and document all specifications to ensure consistent quality.
Part1: Cosmetic Packaging Sample Visual Checks
1.1 Appearance And Branding
You need to start your Cosmetic Packaging Sample inspection by checking the fit and dimensions of your bottle. Make sure the bottle matches your product specifications and aligns with your brand’s visual identity. Examine the logo placement, font style, and color consistency. Compare the sample to your approved artwork and reference dielines. Review the bottle under typical lighting conditions to confirm that branding elements remain visible and readable. Problems like label defects or container damage can impact your brand’s reputation and product presentation.
Visual Defect Type | Description |
|---|---|
Seal Integrity | Issues may not be visible until the packaging is filled and subjected to stress. |
Label Defects | Problems with the label can affect the overall presentation and branding of the product. |
Container Damage | Physical damage to the container can compromise the product’s integrity and consumer perception. |
Compatibility Testing | Essential to ensure that the packaging interacts well with the product formulation. |
If you use specialized bottles, such as airless bottles, custom dropper bottles, or glass dropper bottles, check for unique branding challenges and ensure the sample meets your requirements.
1.2 Print Quality And Color
Print quality and color accuracy play a major role in bottle packaging. You must verify that the color matches your brand standards, considering how pigments interact with materials like PETG, PP, HDPE, acrylic, or glass. Color matching starts with a Pantone reference or sample color. Manufacturers use masterbatch, ink sets, or digital formulations to reproduce the shade. Acceptable color tolerance ranges, such as Delta E values of 2.0, help maintain visual uniformity. Review print quality for issues like low-contrast text and small fonts. Make sure regulatory information appears in the correct zones of your dieline.
Decoration Technique | Description |
|---|---|
Offset printing | Provides high-quality graphics with precise color matching. |
Screen printing | Offers durability and vibrant spot colors. |
Hot stamping | Creates metallic accents and luxury details. |
Label application | Enables small-batch customization flexibility. |
Shrink sleeves | Allows full-surface coverage and graphics. |
1.3 Surface Finish And Gold Stamping
Surface finish and gold stamping add value to your Cosmetic Packaging Sample. Inspect the clarity of the foil, the size and detail of the artwork, and the stamping position. Uneven surfaces can cause poor foil transfer. Evaluate adhesion performance and surface coating. Review artwork size and foil color for luxury bottles.
Review artwork size
Assess foil color
Verify stamping position
Evaluate surface coating
Test fixture support
Analyze adhesion performance
Tip: Always check the sample under real-world conditions to ensure branding consistency and detect defects before mass production.
Part2: Functional And Structural Testing
2.1 Durability And Folding
You must evaluate the durability of every Cosmetic Packaging Sample to ensure it withstands the demands of shipping, storage, and end-user handling. For bottles such as airless pump jars for skincare, repeated actuation and compression can reveal weak points. Common failures during durability testing include:
Leakage
Material deformation
Cracking
Labeling issues
Contamination
Test folding lines and creases on cartons or inserts that support bottles. Weak folds can lead to structural collapse during transit. You should simulate real-world handling by stacking, dropping, and compressing the packaging.
2.2 Insert Stability And Assembly
Insert stability plays a key role in protecting bottles like lotion bottles with pump and face cream jars during transport. Start by understanding your product’s dimensions, weight, and fragility. Select the right box style and insert material. Control tolerances in the structural layout. Always request a physical sample of custom box inserts for verification before mass production. This step helps you confirm that the insert holds the bottle securely and prevents movement or breakage.
2.3 Closure And Seal Integrity
Closure and seal integrity testing ensures your packaging protects the product throughout its lifecycle. You need to verify that the closure system—whether a pump, screw cap, or snap-on lid—remains secure under stress. Seal integrity testing checks for failures that may not appear during initial inspections. These tests simulate real shipping and storage conditions. The following table outlines key standards for closure and seal integrity:
Standard | Description |
|---|---|
European Commission EudraLex Annex 1 | Outlines validated closure techniques, particularly for fusion-sealed vessels like ampoules, with stringent integrity checks. |
USP <1207> | Covers sterile product packaging integrity evaluation and test method selection. |
21 CFR 211.94 | Ensures components of drug product containers are non-reactive and preserve product integrity. |
European Pharmacopoeia | Details examining criteria, test methods, and acceptance criteria for packaging materials. |
Tip: Seal integrity testing identifies hidden risks that could compromise your product during distribution. Always include this step in your Cosmetic Packaging Sample approval process.
Part3: Cosmetic Packaging Sample Compatibility
3.1 Material And Product Interaction
You must check how your product interacts with the bottle material before approving any Cosmetic Packaging Sample. Some plastics can react with active ingredients, which may affect the formula or the packaging. For example, certain polymers absorb fragrances, changing the scent of your product. Acidic serums can corrode metal components, leading to leaks. The table below highlights common compatibility issues:
Compatibility Issue | Description |
|---|---|
Chemical Interaction | Certain plastics can react with formulation ingredients, affecting product integrity. |
Absorption of Fragrances | Some polymers can absorb fragrances, altering the product’s scent. |
Corrosion of Metal Components | Acidic formulations may corrode metal parts of packaging, leading to leaks. |
You should run migration tests to ensure safety and compliance. These tests include screening for heavy metals, carcinogenic amines, polycyclic aromatic hydrocarbons, bisphenols, polychlorinated biphenyls, phthalates, and dioxins.
3.2 Tube Size And Filling Capacity
Selecting the right tube size and filling capacity ensures your bottle fits the product and meets market expectations. Start by choosing the tube diameter for the desired look and ergonomics. Adjust the length to match your target volume, such as 30 ml, 50 ml, or 100 ml. Wall thickness and material should protect sensitive formulas and provide a premium feel. You should also consider the product’s role in your range—mini, core, or jumbo—and how it appears on shelves or online. Always test real samples with your actual formula before mass production.
3.3 Eco-Friendly Material Performance
Eco-friendly bottles, such as refillable skincare packaging, must meet strict performance benchmarks. You need to check recyclability, barrier performance, and shelf stability. The table below compares common sustainable materials:
Material | Recyclability | Barrier Performance | Shelf Stability | Challenges |
|---|---|---|---|---|
BOPP/VMOPP/CPP | High | Medium | Medium | Slightly shorter shelf life |
PET/AL/PE | Low | High | High | Hard to recycle, multi-layer |
PLA-based Compostable | Very Low | Low | Low | Poor oil resistance, spoilage risk |
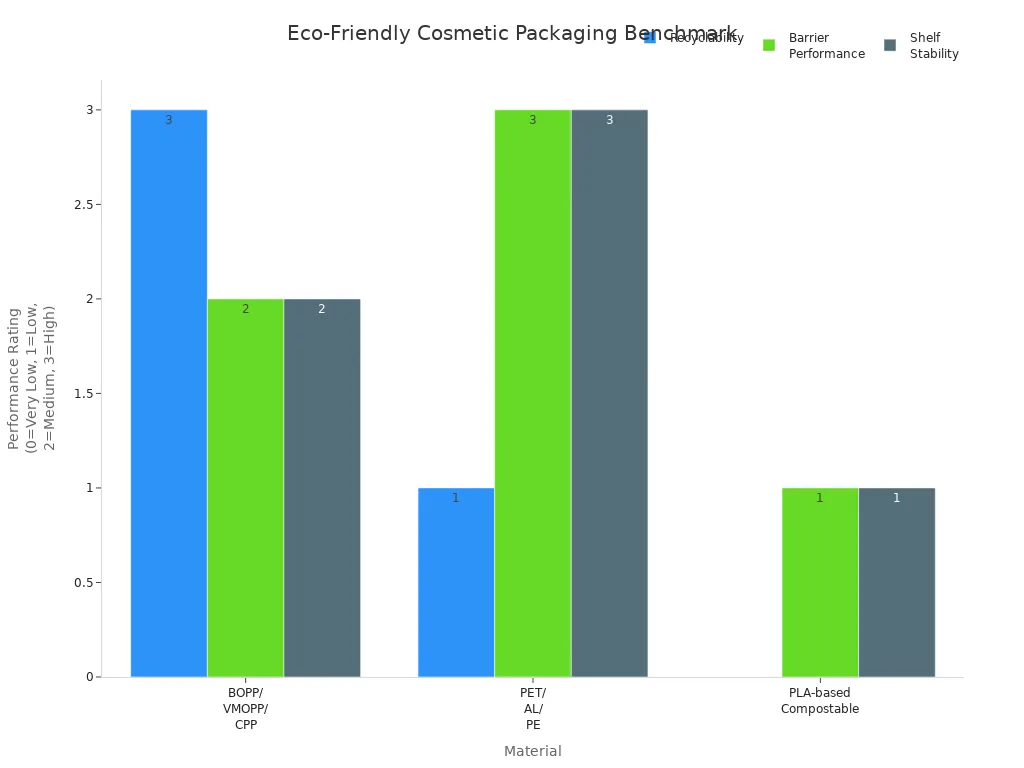
You should also perform cap torque, pull-force, print adhesion, and sealing tests to confirm bottle durability. Review regulatory and safety data for each material and audit your supply chain for compliance.
Part4: Tolerances And Variations
4.1 Measurement Standards
You need to set clear measurement standards for every Cosmetic Packaging Sample before mass production. Accurate dimensions help you avoid costly errors and ensure bottles fit inserts, closures, and shipping cartons. For example, when you approve a 30ml glass dropper bottle, you must check the neck diameter, height, and wall thickness. These standards also apply to square dropper bottles and tubes like face wash tubes or hand cream tubes. You should use calibrated tools and reference samples to verify measurements.
Packaging Type | Tolerance Range |
|---|---|
Folding cartons | ±0.5–1.0 mm |
Rigid boxes | ±1.0–2.0 mm |
4.2 Acceptable Ranges
You must define acceptable tolerance ranges for each bottle and tube type. These ranges help you manage small variations that occur during production. For folding cartons, a deviation of ±0.5–1.0 mm is standard. Rigid boxes allow ±1.0–2.0 mm. You should document these ranges in your specification sheets and communicate them to your suppliers. If you see deviations outside these limits, you need to request corrective action before mass production.
Tip: Always compare your samples to the golden sample and reference dielines. This step helps you spot inconsistencies early.
4.3 Color And Material Variation
To achieve consistent, on-brand color across SKUs and product lines, brands must treat material and color as a unified specification, not two separate tracks.
Material selection plays a critical role in color fidelity. PETG, PP, and glass bottles interact with light differently, which can cause visible color shifts. You must integrate material and color specifications to ensure consistency. Color variations often result from unique equipment and ink formulations at different printing facilities. Display differences across devices can lead to discrepancies in color perception. Pantone chart versions may show significant variations. Human perception of color can vary, affecting the final product. Environmental factors during production can cause slight color changes.
Color variations occur due to unique equipment and ink formulations at different printing facilities.
Display differences across devices can lead to discrepancies in color perception.
Different versions of Pantone charts can show significant variations.
Human perception of color can vary, affecting the final product.
Environmental factors during production can cause slight color changes.
You should always request color chips and material samples for approval. This step helps you maintain brand consistency across all bottle and tube types.
Part5: Supplier Collaboration And Approval
5.1 Reference And Golden Samples
You need to establish clear benchmarks with your supplier before mass production. Reference and golden samples play a crucial role in confirming the direction for material, color, and finish. These samples help you set expectations for every bottle in your order. The table below shows how golden samples support quality assurance:
Aspect | Description |
|---|---|
Benchmark | Golden samples serve as a benchmark for confirming material direction, color, and finish. |
Production Consistency | Maintaining consistency across large production runs is challenging. Small variations can lead to quality issues. |
Risk Reduction | The sample stage reduces production risk before shipment. It ensures that final products match the approved sample. |
You should always keep a golden sample on hand for comparison during production. This step helps you spot deviations early and request corrections.
5.2 Communication Of Specifications
You must communicate your specifications clearly to your supplier. Provide detailed drawings, color chips, and material samples. Specify bottle dimensions, closure types, and decoration methods. Use reference dielines and artwork files to avoid misunderstandings. Suppliers rely on your instructions to deliver consistent results. If you require a quote for a custom bottle, contact Oulete at request a custom packaging quote to discuss your requirements.
Tip: Schedule regular check-ins with your supplier to review progress and address questions. This practice helps you maintain alignment and avoid costly mistakes.
5.3 Issue Resolution And Feedback
You need a process for resolving issues and providing feedback. If you find defects or inconsistencies in your Cosmetic Packaging Sample, document them with photos and notes. Share your findings with the supplier and request corrective action. Use feedback to improve future production runs. Suppliers value clear communication and prompt responses. You build stronger partnerships by addressing problems quickly and constructively.
Document defects with photos and notes
Share feedback promptly
Request corrective action before mass production
Note: A collaborative approach reduces risk and ensures your bottles meet brand standards every time.
Part6: Final Approval Steps
6.1 Internal Review And Sign-Off
You need a structured internal review before you approve any Cosmetic Packaging Sample for mass production. This process helps you catch errors and confirm that every bottle meets your brand’s requirements. Use a step-by-step approach to ensure nothing gets missed. The table below outlines an effective internal review workflow:
Step | Description |
|---|---|
Define the brief | Set clear objectives and requirements for the bottle packaging design. |
Create initial artwork | Develop the first version of the bottle’s artwork for review. |
Internal creative review | Assess the design to ensure it matches the brief and brand standards. |
Legal review | Check that the design follows all legal and regulatory requirements. |
Regulatory compliance review | Confirm the packaging meets industry safety and compliance standards. |
Stakeholder sign-off | Get approval from all key decision-makers in your organization. |
Printer proof approval | Review and approve the final printer proof before production begins. |
Artwork archiving | Store the approved artwork for future reference and consistency. |
You should also document your inspection process, set clear defect thresholds, and state your remedy policy for any quality issues.
6.2 Documentation And Records
You must keep accurate records to support your final approval. Proper documentation ensures traceability and helps you resolve any disputes with suppliers. The following table lists the essential documents you need for each bottle project:
Required Documentation Item | Description |
|---|---|
Brand-approved artwork file | The final design approved by your brand team. |
Final ingredient declaration | The complete list of product ingredients. |
SKU-specific ingredient differences | Details on ingredient changes for different SKUs. |
Selling market and language requirements | Market-specific and language compliance details. |
Container size and fill amount | Exact bottle size and product volume. |
Packaging format and outer-carton plan | Structural and design details for shipping. |
Label or direct-decoration method | The method used for bottle labeling or decoration. |
Proof approval owner and revision deadline | Responsible person and timeline for changes. |
Tip: Keep digital and physical copies of all records for easy access during audits or future projects.
6.3 Mass Production Authorization
You must verify that all criteria are met before you authorize mass production. This step protects your brand and ensures regulatory compliance for every bottle you produce. Review the following key requirements:
Criteria | Description |
|---|---|
Facility Registration | Register your manufacturing facility with the FDA every two years. |
Product Listing | List each cosmetic bottle product with the FDA, including all ingredients. |
Safety Substantiation | Provide scientific proof that your product is safe for normal use. |
Adverse Event Reporting | Report any serious health incidents to the FDA within 15 business days. |
Labeling Enhancements | Include identity statement, net quantity, ingredients, and warnings. |
MoCRA Compliance | Follow new safety, labeling, and reporting standards for all manufacturers. |
You should only proceed with mass production when you have completed all reviews, collected all documents, and confirmed compliance with these standards.
You protect your brand’s reputation by following each checkpoint in the Cosmetic Packaging Sample approval process. Industry experts recommend verifying raw material receipt, inline printing, structural assembly, and final packing. A systematic approach prevents costly errors, such as dimension mistakes or artwork issues, and supports long-term cost savings. Use these steps as your checklist for every bottle project. Keep reviewing standards and collaborate with suppliers to drive continuous improvement.
FAQ
What is a golden sample in bottle packaging?
A golden sample is your approved reference bottle. You use it to compare all production samples. This ensures every bottle matches your quality and branding standards.
How do you test bottle seal integrity?
You perform leak tests by filling bottles and inverting them. You also apply pressure to closures. These steps help you find weak seals before mass production.
Why should you check bottle compatibility with formulas?
Some formulas can react with bottle materials. This may cause leaks or change the product. You must test bottles with your actual formula to avoid costly recalls.
What documents should you keep for bottle packaging approval?
You should keep artwork files, ingredient lists, and compliance records. These documents help you resolve supplier disputes and prove regulatory compliance. For sample review, artwork confirmation, and project documentation support, contact Oulete for a quote before mass production.